OVERVIEW
The following document describes how to import quality historical tick data into Metatrader 5* using Tickstory. This will produce 90+% modelling quality back-tests which are based on tick data (not 1-minute data). Using tick data means your back-tests will be much more accurate than using Metatrader’s standard 1-minute broker data. This is because you will be using real spreads rather than fixed spreads and real-time tick data so each individual price movement that occurred every minute will be passed into your Expert Advisor – just like in live trading!
*NOTE: This guide is for Metatrader 5. If you are using Metatrader 4, please see our guide on out how to get 99% Modelling Quality Back-tests in Metatrader 4 using Tickstory.
STEP 1 – Install Tickstory
Download Tickstory from our website and install it.
STEP 2 – Export Data
In Tickstory, select the financial symbol you wish to export. Tickstory provides easy historical data access to a number of financial instruments that span Forex, Commodities, Indices, Stocks and even Crypto-Currencies. You can test with any financial symbol you choose and Tickstory handles the historical tick data downloads and export all by itself. This makes Metatrader 5 back-tests of your Expert Advisers the most accurate they can be with only a few simple steps!
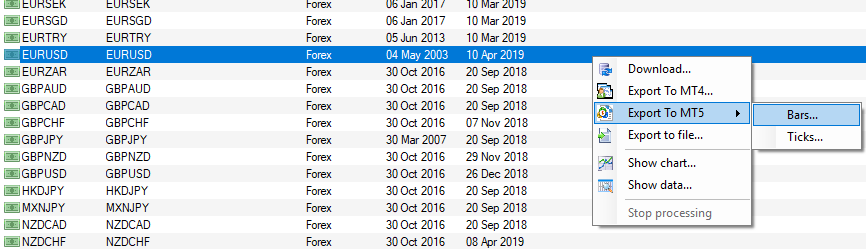
In our example, we will select the FX symbol EURUSD for export. Right-click on EURUSD and select “Export to MT5” and then “Bars…” as shown in the screenshot.
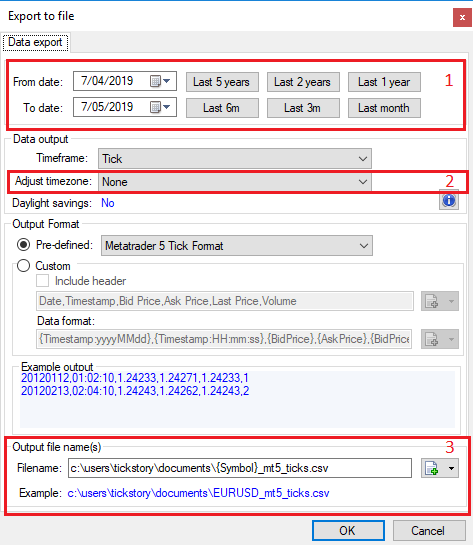
The following window will appear which will allow you to specify your export settings:
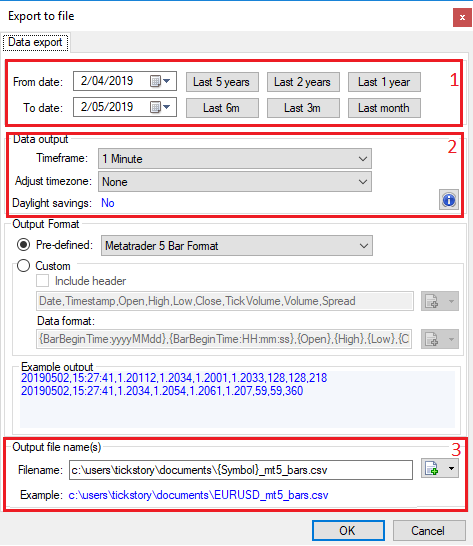
As denoted in the screenshot:
1. Select the date range that you wish to test.
2. Select the time-frame which should be 1-minute bars. Also select the time-zone of your broker.
3. Select the location for the exported file.
4. Start the export and wait for it to complete.
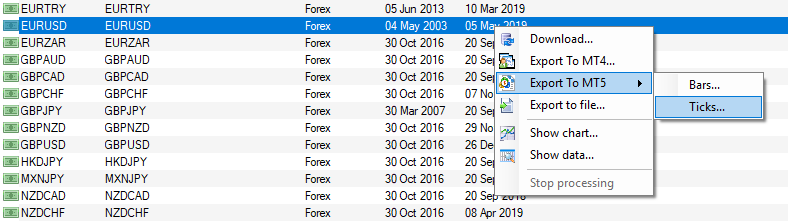
Now, repeat the same process to export tick data. Right-click EURUSD in the main screen again and select “Export to MT5” and “Ticks…“.
As per the previous export, set all your settings:
5. Select the date range that you wish to test – this date range needs to be the same as previously specified when you exported your bar data.
6. Select the time-zone of your broker. The time-zone needs to be the same as you selected in the previous Bar Export.
7. Select the location for the exported file.
8. Start the export and wait for it to complete.
STEP 3 – Import tick and bar data into Metatrader 5
Now to create a custom symbol in Metatrader 5. Custom symbols allow you to create your own instruments in the Metatrader 5 terminal. From there, you can import your own data into the symbol and then use it for back-testing or charting.
In Metatrader 5, go to the View->Symbols menu.
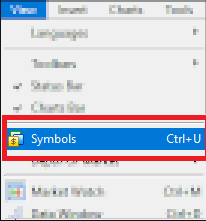
The ‘Symbols’ window as shown will appear.
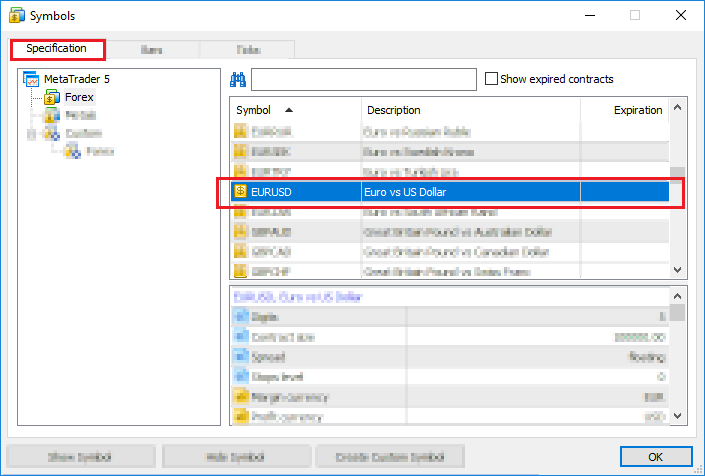
- Select the “EURUSD” symbol from the “Specifications” box (Hint: You can search for a symbol quickly by using the search bar and entering the symbol name).
- Select ‘Create Custom Symbol’. A new dialog box will appear with all the copied specifications for EURUSD.
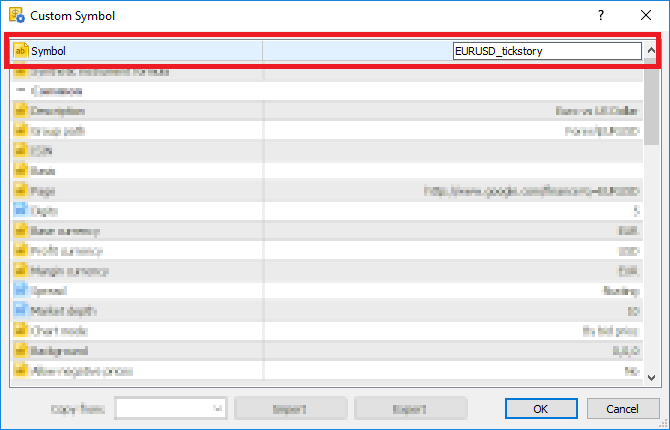
- In the ‘Symbol’ field, enter a unique name for your symbol such as “EURUSD_tickstory”.
- Review the remaining details. The main setting to note is that the “Digits” field is 5. Please consult the Metatrader 5 Help Manual for an explanation of the other settings.
- Press OK to create the new custom symbol.
Now select the ‘Bars’ tab and select the ‘Import Bars’ option (Make sure your custom symbol is selected along with ‘M1’ time-frame!)
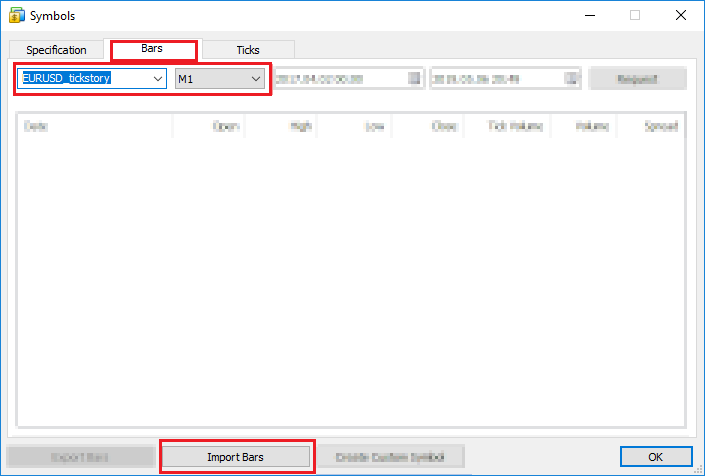
Select the bar data file you exported using Tickstory (i.e. “EURUSD_mt5_bars.csv”). Once selected, Metatrader 5 will begin the process to import your bar data.
When complete, we then select the ‘Ticks‘ tab to ‘Import ticks‘ as shown below.
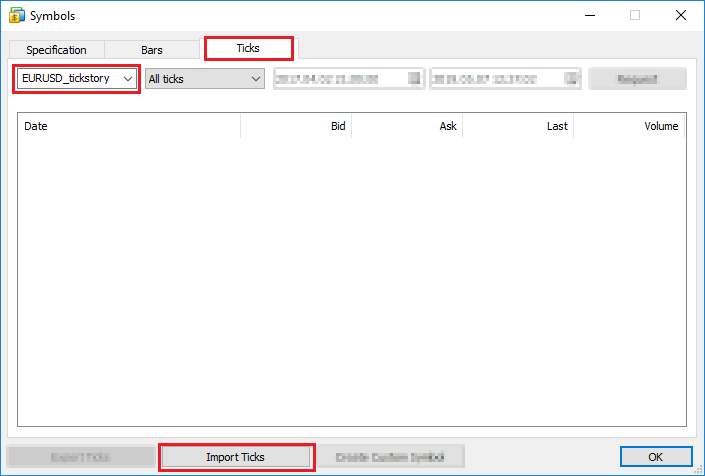
Select the tick data file you exported using Tickstory (i.e “EURUSD_mt5_ticks.csv”). Once selected, Metatrader 5 will begin the process to import your tick data.
STEP 4 – TEST!
In Metatrader 5, select the View->Strategy Tester option to show the tester.
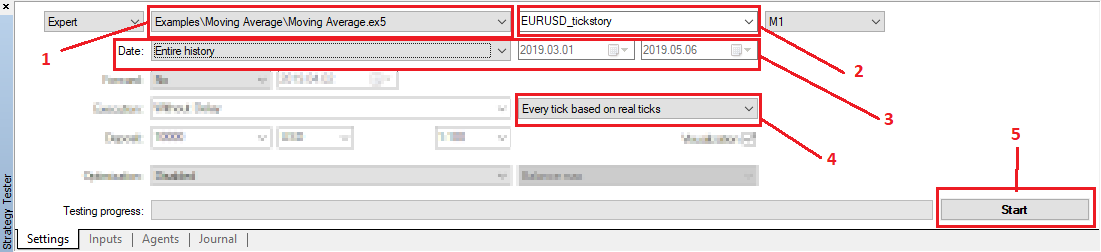
- Select the Expert Advisor you wish to test.
- Select the custom symbol you just created – in our case, ‘EURUSD_tickstory‘.
- Select the date range you wish to test. Make sure these dates are within the range you have exported, otherwise you will not get any results!
- Select the ‘Every tick based on real ticks‘ modelling method.
- Start the test!
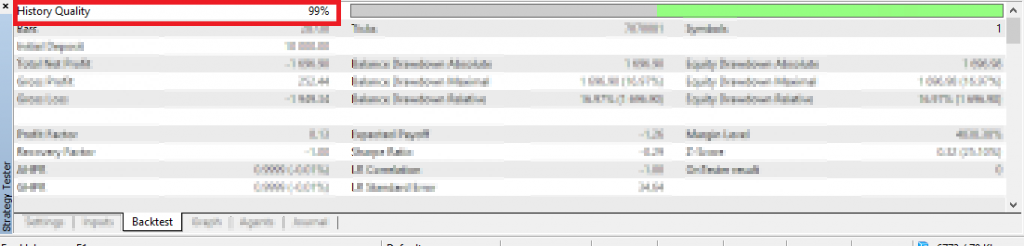
And that’s it! When the test completes, you will have 90%+ quality on your back-test, indicating that you have tested your Expert Advisor with tick data!